The latest version of our manual
Read the manual as pdf.


NEEDSIM Life simulation version 1.0.1
Manual
By FANTASIELEBEN UG (haftungsbeschränkt)
Programming:
-
Simulation Tilman GeishauserEditor Achim Wache
Art:
-
Sprites Martin Wackerbauer
Table of Contents
Part I. Introduction
1 Product description
The NEEDSIM Life simulation makes it quick and easy to simulate daily life of humans, wildlife or even machines. Assign interactions to game objects, and NPCs will use them to satisfy their needs: You can make people watch TV when they are bored, or have animals drink from a lake when thirsty.
- Creative freedom: You decide which needs to simulate with NEEDSIM Life simulation.
- One world, many species: Goblins have different needs than humans.
- Design how often agents have to satisfy a need: Make thirst decay fast, but comfort decay slowly in a hot vacation paradise.
- Interactions can satisfy or decay multiple needs at different rates: Watching TV might satisfy the entertainment need, but give characters an appetite for snacks.
- Objects have slots that agents can go to when interacting with them: Make a double bed out of a single bed by adding a slot.
- Freely drag and drop slots around in the scene to decide where characters will have to be when running the interaction.
- Add a slot to an agent and other agents can run interactions there, for example allowing a fox to eat a bunny.
- Slot allocation: A smart system takes care of distributing available slots to agents.
- Multiple databases for different scenes can be managed. In one scene people might dance and drink in a club, in the next one people could have needs related to working in an office.
- Chose whether agents focus on their goals or whether they focus on the utility provided by the available interactions.
- Based on innovative research presented at the Foundations of Digital Games Conference and the Vienna Game AI Conference.
- Innovative AFFORDANCE TREE technology can be used by programmers to manage computational complexity in large worlds with many different interactions - the NEEDSIM Life simulation can scale to your needs.
- Six example scenes with various scripts and assets, such as beautiful spritesheets and animations for wildlife.
- Manage needs, species, interactions and databases in the editor extension released with the NEEDSIM Life simulation for Unity.
- Debug information: Understand agent state and slot state with our debug information, visible in play mode.
Please be aware that we do not offer a navigation or animation solution. However, our examples provide ideas on how to work with the Unity NavMesh and Mecanim.
2 Further material
Stay up to date! We are hoping to add helpful material to our website in the future. Please check out http://www.fantasieleben.com/.
We have made a three minute demo video to get you started. You can watch it here: https://www.youtube.com/watch?v=VOVHA3oOSQM.
3 The basics
That agents satisfy needs at objects is the basic principle the NEEDSIM Life simulation builds upon. Agents are all form of non-player characters (NPCs). The NEEDSIM Life simulation is a multi-agent system: It manages multiple problems that arise if many agents inhabit the same world.
Agents are driven by their needs. Needs have a satisfaction value with a minimum value of 0, and a maximum value of 100. Usually each need will become more urgent at a specific rate, agents might for example become more hungry at a rate of 0.1 per second.
Needs can become critical, and can become satisfied. You can select values for these states, for example you can say that hunger is critical below 20, and satisfied above 80. This affects at which point agents that use goal oriented behaviors from our sample agent scripts will think about a new action. Furthermore, as a designer, you might want to decide to let an actor that has been critically hungry for a long time die of starvation - you will have to ask for the respective state in a script then.
Hopefully however, the actor will eat something before that happens. Eating is an interaction. Interactions satisfy (or decay) at least one need at a specific rate, for example eating might satisfy the hunger motif at a rate of 0.3 per second.
Interactions can be used at NEEDSIM Nodes - a drop down menu in the inspector allows to select an interaction for a game object that has a NEEDSIM Node component attached to it. For example a banana might afford the interaction to be eaten to the environment - just select the eating interaction in the inspector.
Each agent belongs to one species. Examples for species could be different kinds of people, animals like cats or even trucks and cars.
What differentiates species of agents is which needs they contain. Cats might not have the need to mark a territory if they encounter a tree, whilst dogs might have such a need. Zombies might not feel a need to socialize, and thus, unlike humans, that have this need, will not use phones.
You need exactly one NEEDSIM Manager per Scene. You can attach the NEEDSIM Manager Component to an empty game object, or use our prefab. In the NEEDSIM Manager you have to reference the database you want to use in the scene.
Each object that is affected by the NEEDSIM Life simulation needs a NEEDSIM Node component in Unity. You can select whether the NEEDSIM Node affords an interaction to other agents, and if so, add slots to which agents can go to use the interaction. To add agents to the simulation tick the isAgent box in the NEEDSIM component, and add a way for agents to move, for example a Unity NavMeshAgent.
The name comes from the AFFORDANCE TREE, a tree data structure managing the simulation: Each NEEDSIM Node refers to a node in the AFFORDANCE TREE.
4 Sample Scenes
4.1 Naturleben
Figure 2 Naturleben scene. This scene shows animated objects and agents. Use the arrow keys to move around in the scene. It has a number of spritesheets, animations, and custom scripts. The bunnies and deers will eat, drink and sleep. The three bars next to each character shows how satisfied their thirst (blue), hunger (orange) and tiredness (gray) are.
4.2 Hasenjagd
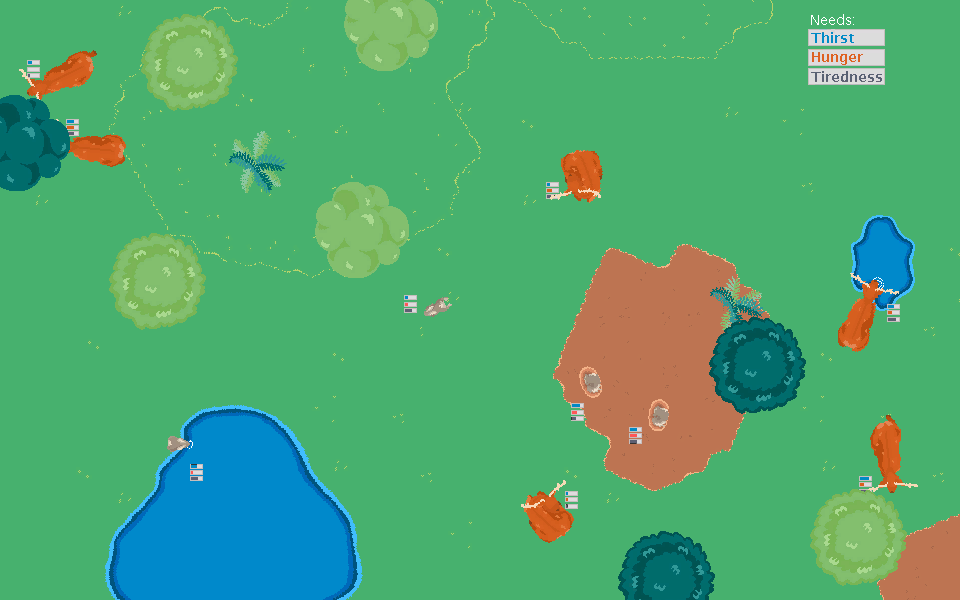
Figure 3 Hasenjagd scene. Agents can offer interactions to the environment. In this simple scene bunnies have the ’EatBunny’ interaction, which satisfies the need ’Hunger’, and a slot where this interaction can be used. New bunnies are spawned, so the fox can always eat. His second need is ’Thirst’. The lake has three slots with animations that can satisfy ’Thirst’ - both for bunnies and the fox. The fern offers an interaction that is only available to bunnies, because its preconditions have been set up accordingly in the NEEDSIM Editor. Furthermore you can watch the bunnies sleep in their rabbit holes.
4.3 Fuchsalarm
Figure 4 Fuchsalarm scene. This scene shows how interruption of NEEDSIM Life simulation behaviors and a day/night cycle in a more densly populated world could play like. During night you can press the ’Spawn Fox’ button. This will cause the normal sequence of behaviors of the bunnies to be interrupted, and the bunnies will not try to satisfy their needs with the NEEDSIM Life simulation, but instead hide under the tree. However, there is no safe place, and the fox will hunt down one bunny and eat it before he disappears again. If the fox is thirsty the fox will drink first. The bunnies run value oriented behaviors. The time system influences how valuable it is to satisfy hunger, thirst and tiredness, so that the bunnies will usually sleep at night, and drink/eat during the day. If however they are not very tired, but very hungry, they might still eat at night. To turn this off set hunger to zero in the time system script.
4.4 Simple Room
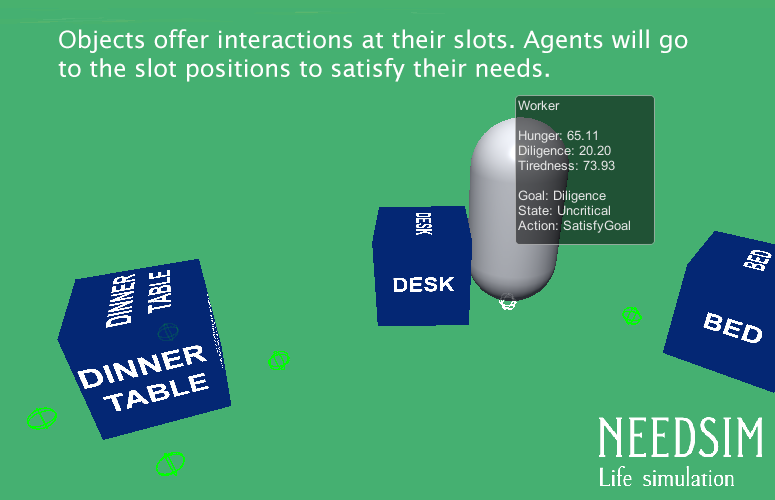
Figure 5 Simple room scene. This scene allows editing of change rates for needs and satisfaction rates of interactions at runtime. Shares the default database with spawn beds scene. This scene shows two species: ’Kid’ and ’Parent’. Unlike ’Parents’ ’Kids’ have the need to learn. ’Kids’ can satisfy their need for ’Entertainment’ both at the TV and with toys. If you own the NEEDSIM Life simulation you can select a bed in the scene view and increase the number of slots from one to two to get a double bed within seconds. Observing this scene for a while is a good way to understand goal oriented behaviors.
4.5 Spawn Beds
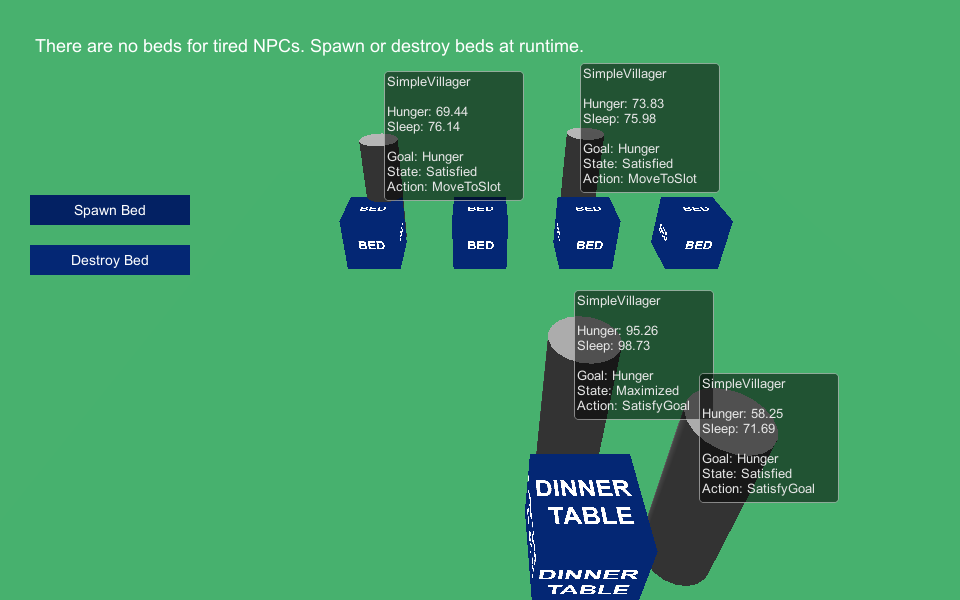
Figure 6 Spawn Bed Scene. This scene shows spawning and destroying objects at runtime. It has a custom script for spawning and destroying game objects with NEEDSIM nodes at runtime. The NEEDSIM Manager is set to not automatically build an AFFORDANCE TREE upon awake. This is a good starting point if you want to build your game world procedurally.
4.6 Simple Time
Figure 7 Simple time scene. Unlike in other example scenes agents here decide on which slot to go to and interact with based on the current utility rather than based on goals. A sample script shows how to weight the value of each need based on time of day. In this example the values are chosen so that agents might for example sleep during the day if they are very tired, but usually they will work or, at breakfast, lunch and dinner time, eat. Respawn characters with the button below to get new random need satisfaction levels. One objective of this scene is to demonstrate how value oriented behaviors play out differently from goal oriented behaviors as seen in the Simple Room scene.
Part II. Set up
5 Setting up your data
We made the NEEDSIM Life simulation so that you can quickly bring your unique vision to life and test ideas efficiently. You can set up species, needs and interactions by selecting Window -> NEEDSIM Life Simulation. Figure 9↓ explains how to add, remove and edit needs, figure 10↓ explains the editor view for species, figure 11↓ shows the editor view that allows management of interactions. Multiple databases can be managed in the advanced view explained in figure 12↓. Once you created a new database you can select it in your scene using the NEEDSIM Manager explained in figure 8↓.
5.1 NEEDSIM Manager
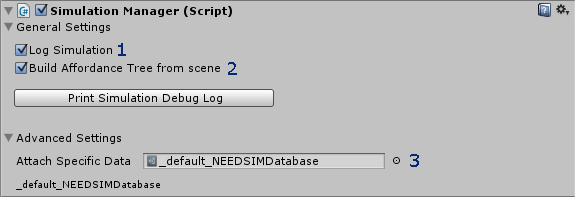
Figure 8 NEEDSIM Manager. Please make sure each scene has one single NEEDSIM Manager. (3) If you are using scene specific databases, please select the database you want to use in the current scene. (1) Furthermore you can log some information whilst the simulation is running, which is helpful for support requests. (2) You can decide whether to build the AFFORDANCE TREE from the scene - this is for example unchecked in the Spawn Beds example scene, as the AFFORDANCE TREE is build from the sample script in that scene.
5.2 Needs View
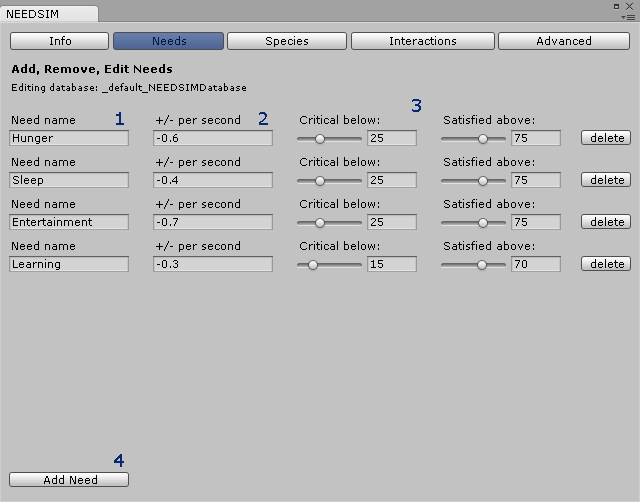
Figure 9 Editor for needs. (1) You can name needs to your liking, for example we named the need to eat ’Hunger’. Please chose a unique name. (2) How satisfied a need is changes over time - we used a negative rate to model how characters get hungry in a simulation where we assume a value of 100 for ’Hunger’ means the agent has a full belly, and zero means he is starving. (3) Sometimes numbers can make things less clear. A need does not only have a numeric value, but we define some numeric ranges to be more abstract states - Critical, Uncritical, Unsatisfied, Satisfied and Maximized. Two sliders make it possible for you to adjust the limits of these states for individual needs. (4) If you want to add needs, press the button in the lower left corner of the window. Each need has a delete button on the very left.
5.3 Species View
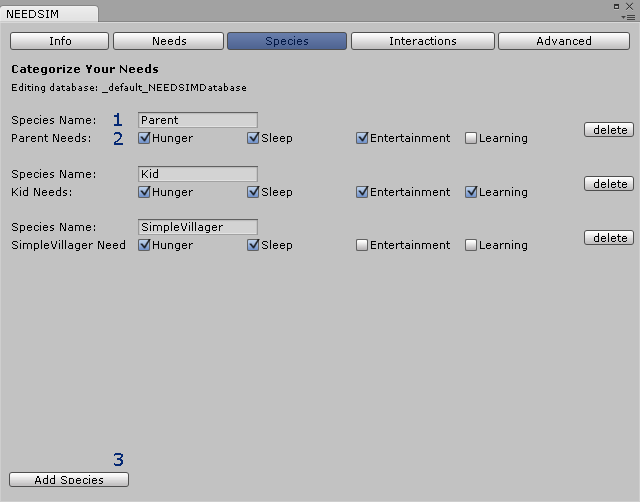
Figure 10 Editor for species. Each species is a set of needs. (1) You have to give a unique name to each species, and will then be able to assign species to agents by this name. (2) Each species should have at least one need. Just tick/untick the boxes to determine which needs make it into the set. (3) If you don’t need a specific species, delete it by pressing the delete” button on the right. If you want to add a species there is a button for creating a new species in the bottom left corner.
5.4 Interaction View
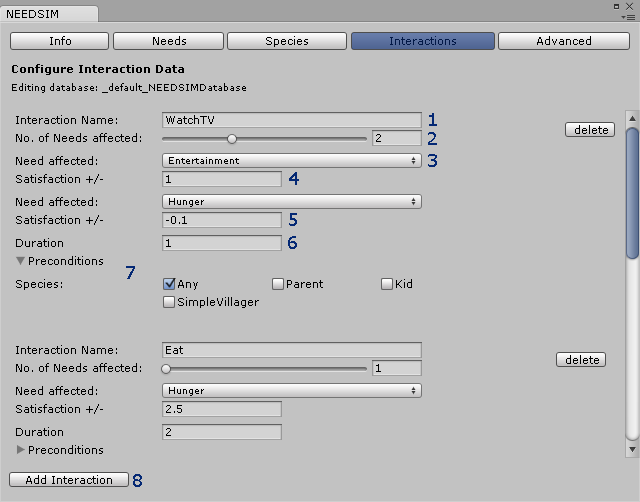
Figure 11 Editor for Interactions. (1) Interactions must have a unique name. (2) Each interaction affects one or more need - move the slider to determine the amount of affected needs. (3) You can select each affected need from a drop down menu and specify a rate (4) at which this specific need is decayed or satisfied per second. In this example watching TV satisfies the need for ’Entertainment’, (5) but at the same time makes character feel hungry by decaying the ’Hunger’ need. (6) Interactions have a duration measured in seconds. (7) Some interactions might only be available under specific conditions. Currently you can use the species of agents as condition for making interactions available to them, and could for example forbid children to watch TV in your game. (8) You can add more interactions to your database, and delete them with the button at the right.
5.5 Advanced View
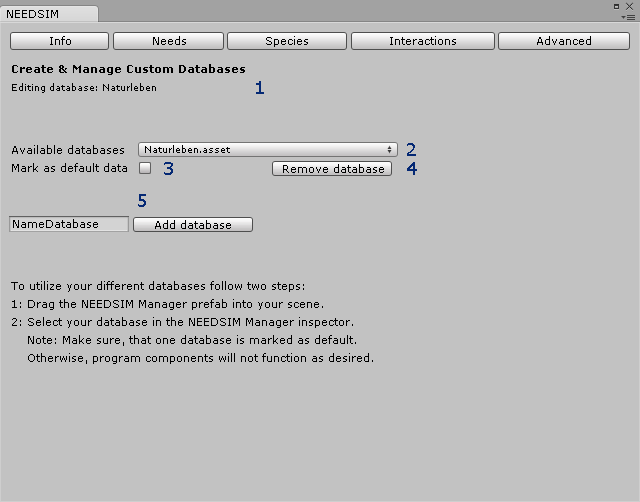
Figure 12 Advanced option: Using multiple databases. You can have a database with needs, species and interactions for each scene. (1) The editor extension will always show you which database you are currently editing. (2) In order to select which database to edit please use the drop down menu. (3) One database has to be marked as default database with the check box, so that some potential sources of errors can be managed. (4) The ’Remove database’ button appears next to this database for non-default databases, and will delete the database currently selected in the drop-down menu. (5) You can add databases by adding a name and pressing the ’Add Unity database’ button . Please keep the .asset file in a folder named ’Resources’.
6 Setting up the NEEDSIM Node Component
Once you have defined some needs, species and interactions you want to work with you can set up the characters and props in the scene to work with the simulation. To do so, attach the NEEDSIMNode.cs script to the respective game objects. Two typical settings are discussed in this manual, the case of a smart object that offers interactions in figure 13↓, and the case of a smart object that is an agent in figure 14↓.
6.1 NEEDSIM Node providing interactions
Figure 13 Interactive NEEDSIM Node. (1) You can select the interaction afforded by this object from a drop down menu. NEEDSIM Nodes that can be interacted with have one or more slots. (2) Agents can go to a slot to do the interaction of the node. You can change the number of slots with the slider or the input field next to the slider. (3) First of all, a slot is a position in the world, shown in the scene view, where it can be moved by drag and drop. (4) If you prefer entering numbers, you can do so in the inspector view. (5) There are further, somewhat advanced options. If you have Gizmos activated, you can see some debug information whilst the game is running. If you want agents not to look at the center of the NEEDSIM Node, but somewhere else, you can use custom look ats.
6.2 NEEDSIM Node that is an agent
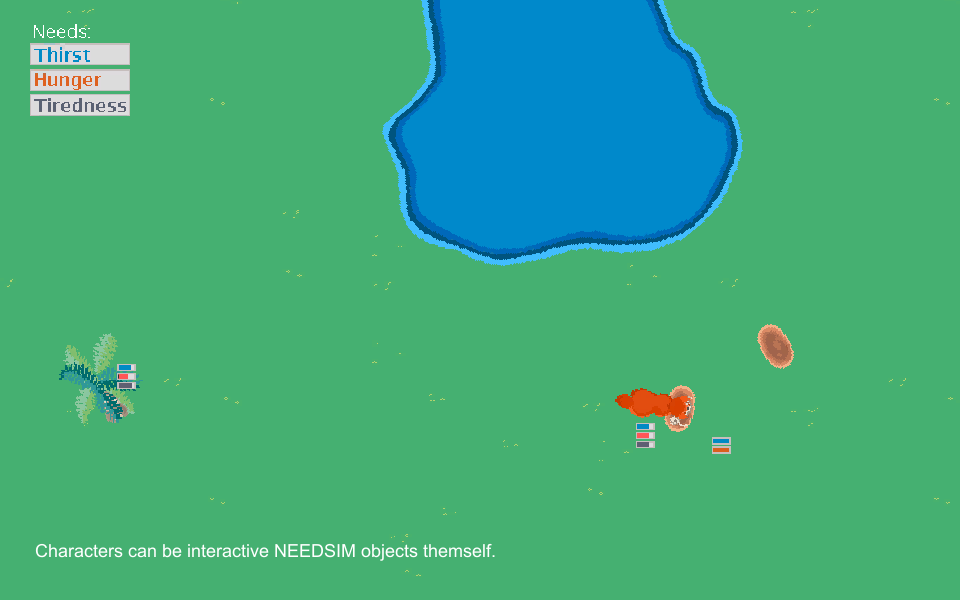
Figure 14 Agent NEEDSIM Node. (1) This NEEDSIM node is set to be an agent with the check box, thus additional options are available. (2) A species for a node that is an agent can be selected from a drop down menu. (3) Various sequences of actions are available, and demonstrate how to author different types of behavior on top of NEEDSIM Life simulation. Goal oriented behaviors will less often satisfy the lowest need, but lead to a more stable behavior in some cases. (4) Debug information is available both in the game and in the inspector. (5) If you don’t want to use random start values for how satisfied each need is when the agent is spawned tick the toggle ’Non-random start values’ and for each need that the species entails values between 0 and 100 can be set. (6) Agents can also be interacted with. Check the Bunny.cs example script to see more on how the interaction EatBunny is used to allow foxes to hunt bunnies.
Part III. Running NEEDSIM Life Simulation in your Project
7 How to use NEEDSIM Life simulation along common solutions
7.1 Integrating your Navigation Solution
In the example scenes that come with the product we use the UNITY NavMesh. However, with a few steps you should be able to use the NEEDSIM Life Simulation with any navigation solution. For the system to work agents need to be able to arrive at slots. You might have to make the following changes in order to use your navigation solution:
- Define arrival at a slot: Open the Blackboard.cs file in NEEDSIM > Scripts > Agent. The method HasArrivedAtSlot() has a condition we use for the UNITY NavMesh. You might need a different condition depending on your project and your navigation solution.
- Replace the call of SetDestination(): Open the Blackboard.cs file in NEEDSIM > Scripts > Agent. The method AcceptSlot(...) contains a call of SetDestination() on the UNITY NavMesh agent.If you don’t want to use the UNITY NavMesh you have to call a similar method from your own solution.
7.2 Using Mecanim for Animation
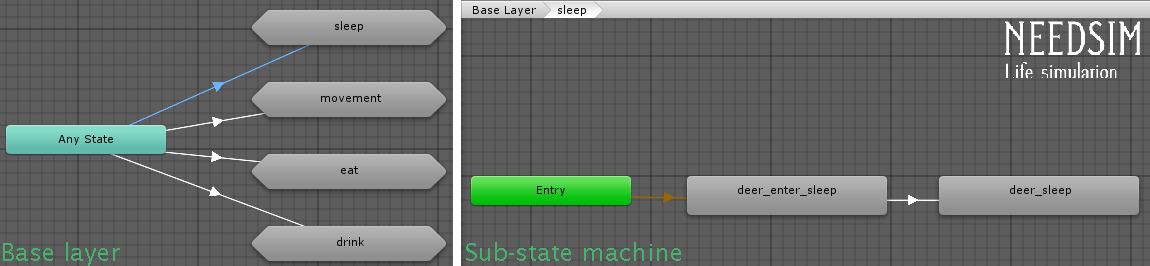
Figure 15 Mecanim state machine example. The base layer has connections to all sub-state machines from any state, so it remains simple and clean, even if you have tons of sub-state machines. The triggers for the transitions have the same name as the interactions in the NEEDSIM Life simulation - thus a simple sample script can handle the control of the base layer. The sample script will always call SetTrigger(interactionName) in the animator. So if you called the interaction to sleep ’Sleep’, and you named the trigger the same way, then as soon as a character has arrived at a slot and the NEEDSIM Life simulation has given the final ok that he or she is allowed to do the interaction ’Sleep’ SetTrigger("Sleep") will be called at the animator of the character and thus the sub-state machine for sleeping animations will be played.
The states the artificial intelligence is in are usually not the same as the states of an animation system. We don’t provide a solution for animation at the moment, and can not yet promise that we will provide a solution in the future.
However, some scenes like our Naturleben scene have sample scripts demonstrating a simple idea on how to interface our simulation with Mecanim. The idea is that you name the conditions for your transitions the same way as the interactions. Then you can call TryConsumingAnimationOrder(Animator animator) on your NEEDSIM Node.
This method assumes that in the animator a trigger named "Movement" exists, and that for each interaction a trigger with the same name exists in the animator, e.g. that for the interaction "Eat" a trigger named "Eat" is in the animation and is used to transition into a state or sub-state-machine that plays animation(s) for eating. See an example animator in figure 15↑.
This method, and our sample scripts in the Naturleben scene, provide a starting point when you want to integrate the NEEDSIM Life Simulation into your project.
7.3 Integrating NEEDSIM Life simulation with Behavior Trees, GOAP, etc
NEEDSIM Life simulation can easily be integrated into the behaviors or actions of behavior trees, goal oriented action planning (GOAP), queues, or other agent-centric control solutions.. The example behavior scripts are written in a way that the code used in the Run methods of our example actions can quickly be copy/pasted into your control solution. NEEDSIM Life simulation ships with an example scene (see fig. 4↑) that shows how the NEEDSIM Life simulation is turned on/off. NEEDSIM Life simulation is satisfied with being run in the IDLE Behavior of your agent-centric solution, so that if your NPC ends up in a fight he can go use GOAP/BT/etc. and think about the world from her/his perspective: Where is my enemy, where is cover, etc. But once she/he is out of a fight there is no more need to do so, and the agent can be controlled by the environment/NEEDSIM Life simulation again.
Part IV. Tips, Tricks & Troubleshooting
8 Tips & Tricks
8.1 Debugging
8.1.1 Debug Log
A NEEDSIM Manager with the default database loaded is automatically added to the scene if you press play. However, using the NEEDSIM Manager Prefab, or adding the script to a game object in the scene, gives you configuration options as well as the option to load different scenes. You can turn off the debug log to reduce string operations (but you can of course also just delete the method body in the script to further optimize).
8.1.2 Slot debugging
Slots can be in different states. In order to see the state of a slot whilst the game is running, you need to activate gizmos in Unity.
- If a slot is green it is available to agents.
- If a slot is yellow, it is reserved to an actor.
8.2 Frequently Asked Questions
How can I use multiple interactions on one object?
Whilst this is not properly tested coders should be able to use the Simulation.Affordance.AddInteraction() method to add multiple interactions to the Simulation.Affordance of an Affordance Tree node., and can then select which one to start either randomly, or by using a name. In the NEEDSIMNodeInspector there should be some commented code that might work and would allow you to add multiple interactions from the inspector view.
Why is AddNEEDSIMNode not automatically called inside the NEEDSIMNode?
A reason is that AddNEEDSIMNode(NEEDSIMNode node, NEEDSIMNode parent) is used to create advanced representations of the world, and a NEEDSIMNode might not know which parent it should be attached to. For example the NEEDSIMRoot.BuildAffordanceTreeFromNode(NEEDSIMNode node) method uses the scene hierarchy to build the Affordance Tree. This allows you to build a representation of a world with villages with houses with objects such as beds and tables, and the nodes have to know their parents.
9 Troubleshooting
Did you rename a NEEDSIM Node? In that case you need to change the typeof(...) to the new name in the NEEDSIMNodeInspector.cs:
CustomEditor(typeof(NEEDSIMNode))]
public class NEEDSIMNodeInspector : Editor
If your agents are not doing anything, please make sure that in the species assigned to the actor you checked at least one need. Please make sure you have an interaction that can satisfy this need. Please make sure there is a NEEDSIM Node in the scene that has this interaction. Make sure that across the objects that have interactions satisfying the need there are enough slots for all agents.
Please make sure the interaction afforded by the object satisfies the agents current need - The value at which it increases need satisfaction should be higher than the value at which the need decays.
The example agent that comes with the product relies on navigation information. When using the example agent or similar solutions, please make sure slots are on your NavMesh solution, and that arrival at a slot can be properly validated.
There can be issues with multiple agents going to overlapping slots, for example if they have a rigidbody attached - there should be enough distance between slots, so that agents can use them.
Having more than one NEEDSIM Node component on the same game object can result in values being overwritten.
Part V. Patch notes
10 Patches
Patch 1.0.1
- The inspector of the NEEDSIMNode now shows a toggle “Use non-random start values”. If ticked you can select specific start values for each need.
- NEEDSIMNodes now have a method that will help the method NEEDSIMRoot.BuildAffordanceTreeFromNode(NEEDSIMNode node) build an Affordance Tree from a specific node.
- The scene 04. Simple Room now lets you edit at runtime how needs change per second, and how interactions affect needs. The scripts InputFieldRuntimeEditing.cs and SpawnUIRuntimeEditing.cs are new, as well as the prefab InputFieldRuntimeEditing.cs
- The example action provided in DoSingleInteraction.cs had a misleading name, and we renamed this script to SatisfyUrgentNeed.cs
- We added more comments.
- The sample scripts now have tooltips instead of comments for their properties.
The API was unnecessarily complicated so we made some changes that are unlikely to affect anyone so soon after the initial release.If they do, please write to support@fantasieleben.com and we will help you out. The benefit is that potential sources or errors are reduced, and that code completion and documentation are less cluttered. The changes include:
- The method Simulation.AffordanceTreeNode.Update() was only called once from the root (recursive method to update all nodes in the tree), so to improve the API we made Simulation.Manager.Instance.UpdateAffordanceTree() the place to update the tree.
- Simulation.NeedItem constructor no longer has min/max values as the default values were used.
- Unnecessary strings in our Simulation.Strings class were removed, as the features they were written for no longer exist or have changed.
- Some properties that are potential sources of error if used wrongly have been made internal instead of public in Simulation.GameDataManager, Simulation.Goal, Simulation.SimulationData and Simulation.AffordanceTreeNode. Simulation.SimulationData now exposes ChangePerSecond - see scene 04. Simple Room for how to work with it.
- The Uncritical state has been removed from the Simulation.Needs.NeedSatisfactions enum, as it is meaningless in the current simulation.
- Methods of the NEEDSIMEditor that where exposed by mistake are no longer exposed.
- The default name for new databases has been changed.
- Small mistakes in the manual have been corrected.
- A potential source of errors in how the Affordance Tree was build has been fixed.